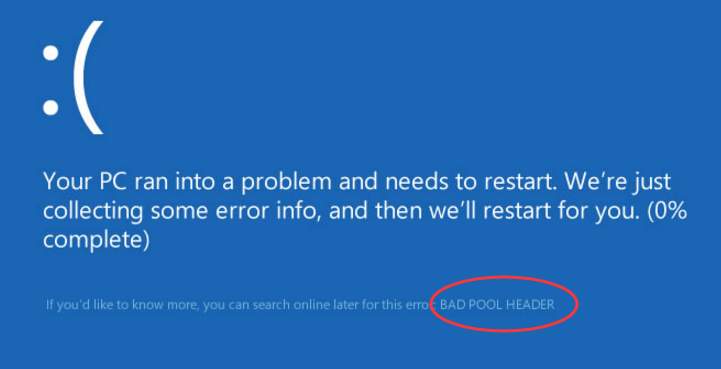
If you are a Windows user, chances are you would have encountered at least one or two “Blue Screen of Death” errors while working. BSODs occur, while utterly frustrating, are not always difficult to resolve.
They usually occur when you install new hardware or software, and it does not work well on your PC. That said, you might also get BSOD for a number of other reasons such as:
- failing hardware
- corrupt system files
- problems with your RAM or hard disk
- other random reasons
A BSOD is actually not your enemy. Think of it as part of your Windows computer’s defense mechanism. It occurs so that your computer doesn’t incur any further damage because of the underlying hardware or software issue.
Many Windows 10 users have reported receiving “bad pool header” BSOD. Are you receiving this error as well?
If so, you are at the right place. Here are four easy-to-follow solutions to get rid of this BSOD error once and for all.
What is a bad pool header error?
The bad pool header error comes with a code 0x00000019, and as said above, a number of things can cause it.
When you get this error, your PC may restart abruptly and you will lose all unsaved work. That can be fatal especially if you are working on an important project, presentation, or document.
Solution One – Disconnect external devices and drives
Disconnect all external devices and drives except your keyboard and mouse. Now use the PC normally and check whether you’re getting the error.
If no, it means an external drive or device was the culprit. After confirming the cause, find the problematic device or drive.
How to do that? Glad you asked.
Connect external device and drive one at a time, and see after connecting which device you receive the error. For example, if you get the BSOD error after connecting the external hard disk, that’s where the problem lies.
The next step is to detect what’s wrong with the problematic device and fix the issue. Alternately, you may consider installing a new device. For instance, if your hard drive is the real culprit, you may find replacing it a better idea — and even a cheaper one perhaps — than repairing it.
If the above solution did not resolve the issue, move on to the next solution.
Solution Two- Disable 3rd party anti-virus temporarily
Some 3rd party anti-virus does not work well with Windows 10 and you might get the titled error after installing or updating a 3rd party anti-virus.
To rule out this possibility, disable the anti-virus temporarily. The steps to disable anti-virus vary from one provider to the next. Check the documentation of your anti-virus solution to find out how to disable it temporarily.
In general, you can disable anti-virus temporarily through its interface. Just dig into its settings and look for an option like disable temporary, disable for XXX minutes/hours, disable until next restart.
After disabling 3rd party anti-virus solution, use your PC normally. If you do not get the error, it’s safe to assume that the 3rd party anti-virus was the cause behind the BSOD error.
In that case, you can switch to a better 3rd party anti-virus solution or use Windows Defender that is part of Windows security tools. If you have been using 3rd party anti-virus solution, windows defender is more likely to be disabled. You need to enable it by following the steps given below.
How to enable Windows Defender?
- Click the Windows logo button to bring up the Start menu
- Scroll down and click the Windows Security option
- On the Windows Security window here are some things you will find.
- If you will see a green tick on Virus and threat protection, it indicates a 3rd party solution is active on your system. In that case, you need to uninstall it and then perform these steps.
- If you do not see a Windows tick, it indicates no anti-virus solution and Windows defender is active on your system. In that case, you need to activate Windows Defender
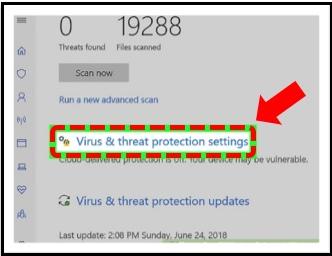
- Click Virus and threat protection
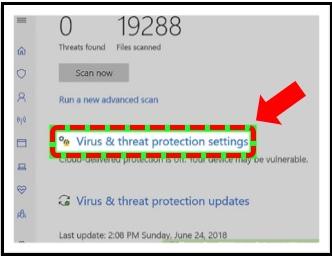
- Next, click Virus & threat protection settings
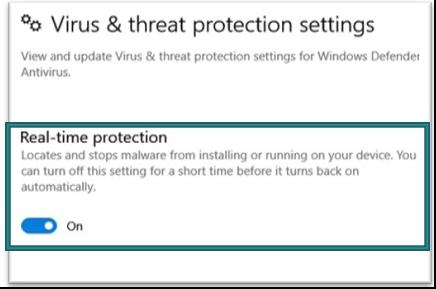
- Turn On the Real Protection
If disabling 3rd party anti-virus solution does not help, move on to the next solution.
Solution Three – Disable Fast Start-up
Windows 10 comes with a Fast Start-up option that reduces boot time. When you select Fast Start-up, Windows will enter hibernation mode when you shut down the computer instead of shutting down all windows.
When you start your computer the next time, Windows will use the hibernation file to boot windows. In other words, it will not load system drivers as it does in a normal boot.
Many users were able to resolve bad pool header BSOD error by disabling fast start. The idea behind disabling fast start-up is to force windows to boot normally and load all system drivers and components at every boot.
Here are the steps to follow.
- Press Windows key and R simultaneously to open Ease of Access Center
- Click Power Option from the menu
- <insert – bph – power options>
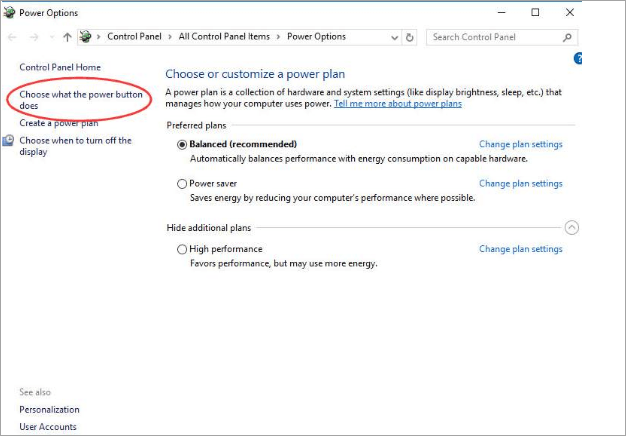
- In the Power Options window, click Choose what the power button does
- In the System Settings window, click Change settings that are currently unavailable
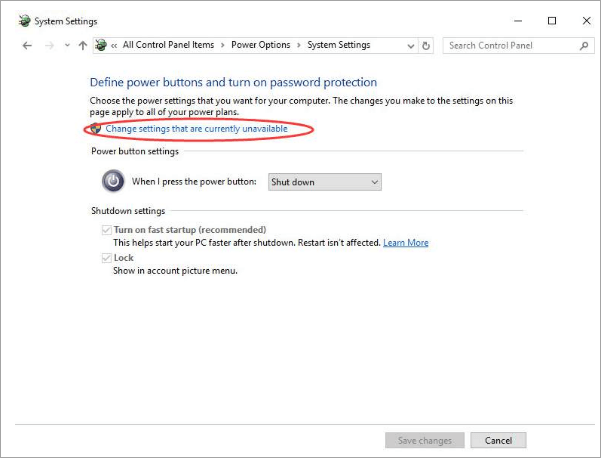
- Uncheck Turn on fast startup (recommended)
- Click Save changes
- Reboot your PC
Use your PC normally and see whether your system throws bad pool header BSOD error. If the issue remains still unresolved, move on to the next solution.
Solution Four – Update Drivers
Drivers are essential software components of Windows. Over time, drivers may become corrupt or go missing (accidental deletion) which may lead to BSOD errors like bad pool header. Hence, you need to update all drivers on your system.
You can update your device drivers in two ways—manually and automatically.
The manual process, besides being tedious, is time-consuming and requires some technical risk. It also comes with a certain degree of risk, especially if you download the driver file from an unreliable source.
Updating Drivers Automatically
Automatic driver update tools offer many benefits, the most important ones being:
- You can update device drivers automatically
- The software scans and updates all outdated or missing drivers at one go
- The tool picks the right drivers for your device and operating system, so you won’t have to worry about installing an incorrect driver by mistake
- Automatic driver updates are 100% safe
Driver Updater is one of the best driver update tools out there. Outbyte Driver Updater will give you access to a database of over 1 million drivers. It will regularly scan your PC, suggesting new driver versions to install. Driver Updater contains drivers for a variety of Windows devices. With just one click, you can update drivers in your system.
Step 1
Click here to Install and launch the app
Step 2
Scan all devices
Step 3
Install or update drivers automatically
Solution Five – Check RAM
A faulty RAM can also cause bad pool header BSOD error. Hence, you need to check RAM and rule out the possibility of a faulty RAM.
Windows comes with a memory diagnostic tool that can help find any problems with RAM. Here are the steps to run Memory Diagnostic Tool.
- Press Windows key and S together. This will open Windows Search
- In the search box, type Memory Diagnostic and hit Enter on the keyboard
- Click Windows Memory Diagnostic from search results
- The Windows Memory Diagnostic tool is launched and you are presented with two options – 1) Restart Now and check for problems recommended and 2) Check for problems the next time when I start my computer
- Click 1st option
- Windows Memory Diagnostic takes time to complete the memory scan which depends on the amount of RAM installed in your system. Be patient and allow the tool to complete the operation.
If it finds errors, it will show on the screen. In that case, you need to replace the RAM module. If it does not show any errors, you can conclude there is no problem with RAM.
Like most users, one of the solutions in this post is very likely to work for you. Follow the instructions carefully and you will be able to resolve bad pool header BSOD error without any professional help.

Leave a Reply