Ask any ordinary user if uninstalling drivers is an easy task, and the answer you’re likely to get is “no”. Uninstalling a driver manually is often time-consuming and requires a bit of technical knowledge. That’s as may be, there are times when uninstalling a problematic driver is the only way to fix an issue.
In this post, we will show you two different ways in which you can manually uninstall an old or problematic Nvidia driver on Windows (with relatively ease). In addition, we will talk about the benefits of using a reliable driver update tool for updating device drivers.
So let’s get started.
How to uninstall a problematic Nvidia graphics driver manually on Windows 10
You can manually uninstall a Nvidia driver (or for that matter, any other device driver) using Device Manager, a built-in utility that allows you to manage the various hardware devices and their components. The other method of uninstalling a Nvidia graphic driver is using Control Panel.
Before we discuss both these methods, a few words of caution:
- Make sure you uninstall the exact driver you wanted to. Before uninstalling a driver, check its version and name. Uninstalling a wrong driver can cause all sorts of issues, including system crash, blue screen, and device not working
- It’s always a good idea to create a system restore point before uninstalling a driver. This way you will be able to revert to old driver if uninstalling it causes any unexpected issues
Uninstalling a Nvidia Driver via Device Manager
Before we look at the steps you need to perform to uninstall a driver via device manager, let’s first understand what drivers are and when you may need to uninstall them.
Think of drivers as a communication bridge between your system and a device, such as a graphics card. Drivers ensure these two things can communicate with each other. Some 3rd party software also need a driver to guarantee seamless user experience. Examples include computer games like Earthfall, FIFA 19, and Forza Horizon.
You might be wondering: If drivers are so important, why would anyone ever want to uninstall them?
There are several good reasons to uninstall a driver. Let’s say you have have just removed a device or software from the system because you no longer need it. In this case, it will be a good idea to uninstall its driver as well. You may also need to uninstall a driver if it is old or incompatible with your device.
Keep in mind that unused, outdated, or corrupt drivers may trigger all sorts of problems, including blue screen, crashes, system freezing, etc. So it is important to promptly uninstall a driver you no longer need.
The most popular method for uninstalling a driver manually, including NVIDIA Graphics Driver, is via the Device Manager. Here are the steps for that.
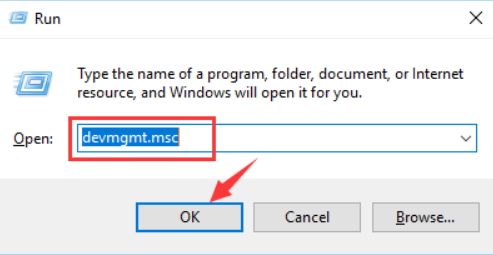
- Press Windows key + R to launch the Run dialog box/li>
- Now type devmgmt.msc and click the OK button
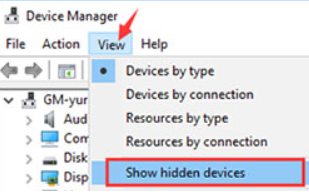
- In the Device Manager window, click the View tab, and select Show hidden devices
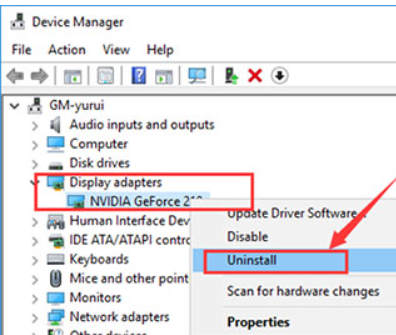
- Now all the devices being used on your computer will appear. Browse through the list until you see Display adapters. Next, expand it and right click NVIDIA graphics card
- Select Uninstall
- You will be asked to confirm your action. Make sure the checkbox against “Delete the driver software for this device” is selected and then click the OK button
- Restart Windows if prompted
Uninstalling NVIDIA Graphics Card Driver via Control Panel
Here are the steps you need to perform:
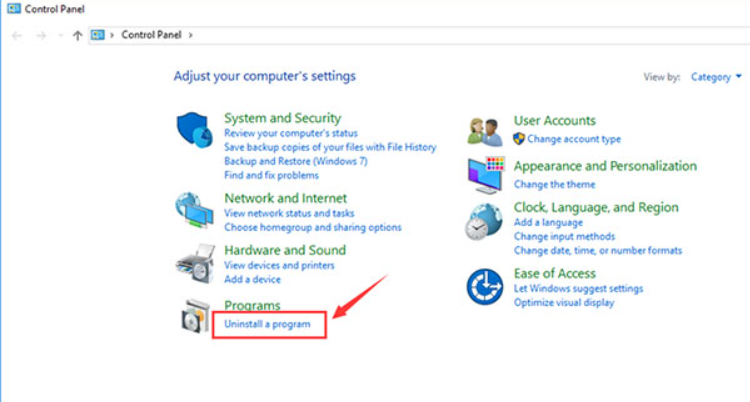
- Press Windows Key + X and then select Control Panel
- Click Uninstall a program
- All the installed programs will appear on your screen. Browse through the list until you see Nvidia graphics cards. Right click it and select Uninstall
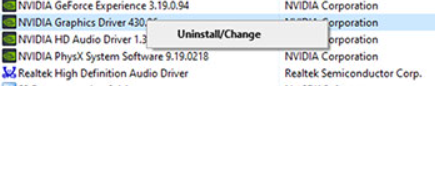
- Windows will now uninstall the driver. Restart Windows after the uninstalling is complete if prompted
Well, that’s just about it on how to uninstall a NVIDIA graphics card driver manually. Before we leave you, a few words of advice. It is important that you keep your drivers up to date all the time. That’s because outdated drivers can not only cause errors and performance-related issues but also pose a security risk.
The easiest way to update your drivers is by using a reliable automatic driver update tool, such as Driver Updater.
Automatic driver update tools offer many benefits, the most important ones being:
- You can update device drivers automatically
- The software scans and updates all outdated or missing drivers at one go
- The tool picks the right drivers for your device and operating system, so you won’t have to worry about installing an incorrect driver by mistake
- Automatic driver updates are 100% safe
Driver Updater is one of the best driver update tools out there. Outbyte Driver Updater will give you access to a database of over 1 million drivers. It will regularly scan your PC, suggesting new driver versions to install. Driver Updater contains drivers for a variety of Windows devices. With just one click, you can update drivers in your system.
Step 1
Click here to Install and launch the app
Step 2
Scan all devices
Step 3
Install or update drivers automatically

Leave a Reply