Are you unable to use the very useful Search feature because of Start Menu Is Not Opening issue?
If yes, you’re not alone.
Many users are grappling with this problem. And in different PCs, the cause can be different.
But you don’t need to worry. We will show you how to solve the issue.
This post discusses several ways to solve Start Menu Is Not Opening issue. You don’t have to try all of them. Start with first one and proceed downward until the issue is resolved.
So, let’s begin…
Solution 1 – Re-log to your account
In case the Start menu is appearing at times and not present at other times, re-logging into the desktop might do the trick.
Here are the steps to follow:
- Press Ctrl+Alt+Del
- Click Sign out
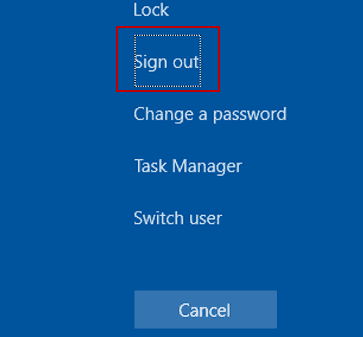
- Enter the login password to re-login
- Check if the Start Menu is working fine
Solution 2 – Setup a new user account
If the step 1 doesn’t work or if the Start menu is absent not occasionally but all the time, try this step:
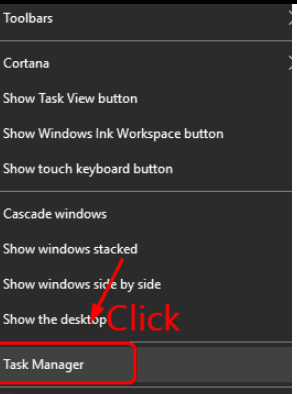
- Right-click on taskbar and select Task Manager
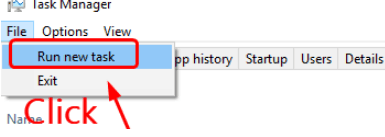
- In the Task Manager window, click the File Next click Run new task.
- In the Create new task dialog box, type powershell and select the box against Create this task with administrative privileges.
- Click OK.
- Copy and paste the following command in the PowerShell window and press Enter

We have used the username “user1”. The password is “drivers”

- Reboot your PC
- Login to the new account
- Now the Start menu should be working just fine. Now, make the new account a Microsoft account. Next, transfer the files as well as settings.
Solution 3 – Reinstall video drivers and sound drivers
More than a few users have stated that in their case the culprit was sound driver and video card driver. When they updated their sound and video drivers, they were able to get rid of the problem.
Here are the steps you need to follow:
First uninstall video and sound drivers
- Press Windows + X to open Quick Access Menu and then select Device Manager

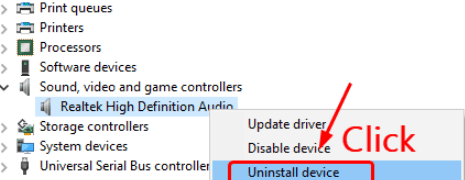
- In the Device Manager window, double-click Sound, video and game controllers
- Right-click the audio card driver and then select Uninstall device
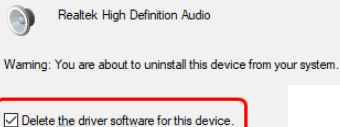
- In the next screen you’ll get a message asking you to confirm if you want to delete the installed drivers. Simply select the box against Delete the driver software for this device.
- Reboot your pc
- Update your video and audio drivers (discussed ahead)
There are two ways to update your drivers—manually and automatically.
Updating drivers manually – This process is tedious and time-consuming. Worse, you might not be able to find the right drivers even after spending considerable time and effort. If you want to update drivers manually, go to video card manufacturer’s website and download the latest drivers released for your operating system.
Updating drivers automatically –
Automatic driver update tools offer many benefits, the most important ones being:
- You can update device drivers automatically
- The software scans and updates all outdated or missing drivers at one go
- The tool picks the right drivers for your device and operating system, so you won’t have to worry about installing an incorrect driver by mistake
- Automatic driver updates are 100% safe
Driver Updater is one of the best driver update tools out there. Outbyte Driver Updater will give you access to a database of over 1 million drivers. It will regularly scan your PC, suggesting new driver versions to install. Driver Updater contains drivers for a variety of Windows devices. With just one click, you can update drivers in your system.
Step 1
Click here to Install and launch the app
Step 2
Scan all devices
Step 3
Install or update drivers automatically
Solution 4 – Temporarily disable any installed third-party antivirus software program
In case you are facing the Start menu issue after you’ve installed a third-party antivirus tool such as AVG, Kaspersky, Avast Behavior Shield, Malwarebytes, or Norton, you should turn the antivirus tool off temporarily.
Next restart your computer and check if now you can see the Start Menu. If yes, get in touch with the vendor for help.
Temporarily shutting off your antivirus tool should not cause problem because you’d still have Windows Defender protecting you. By default, this anti-malware from Microsoft is turned on.
Solution 5 – Get rid of Dropbox
Some users have said that they got the error soon after installing Dropbox and were able to get the Start menu back after uninstalling it.
You can try this option if you, too, are getting the error after you’ve installed Dropbox.
Here are the steps to follow:
- Press Window + R on the keyboard and then type control and press OK

- In the View by drop-down menu, select Category and then select Uninstall a program
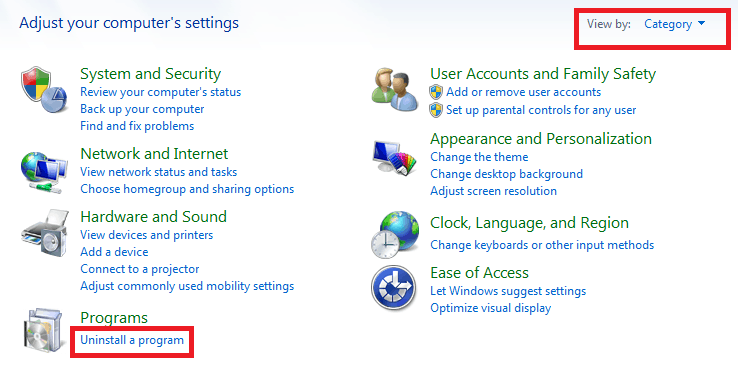
- Browse through the list until you see Dropbox. Select it and click Uninstall. Follow the onscreen prompts.
- Restart Windows

Leave a Reply