The two most frustrating things to have problems with on your computer are the audio and the microphone. If your audio is not working, you can’t hear anything or the sound is not as it should be. If your microphone is not working, then nobody can hear you!
With videoconferencing and online meetings and learning becoming more important than ever, having problems with your microphone in Windows 10 or any other system, is not an option.
Microphone problems in Windows 10
How do you know if you are having problems with your microphone?
Whether you are using an external or a built-in microphone, problems will become apparent when either users cannot hear you or you can’t activate voice commands.
If you are using an external wired microphone then test it on another device to rule out any issues with the microphone itself or the port you are using.
Before continuing with the software fixes, make sure the microphone itself is working. If it is external you can test it on other devices, if the problem is with the microphone then it may just need to be replaced.
Microphone Options in Windows 10
Windows 10 microphone options work differently to previous operating systems in that microphone input can be disabled across all applications via the Operating System.
If you are having problems with your microphone in Windows 10, one of the first things to check is your Webcam. If your webcam is disabled then all microphone input across all other applications will be disabled too. If your webcam is disabled, try enabling it in System settings and see if this fixes your microphone issue.
Microphone settings in Windows 10
The next thing to check is your actual microphone settings. To do this:
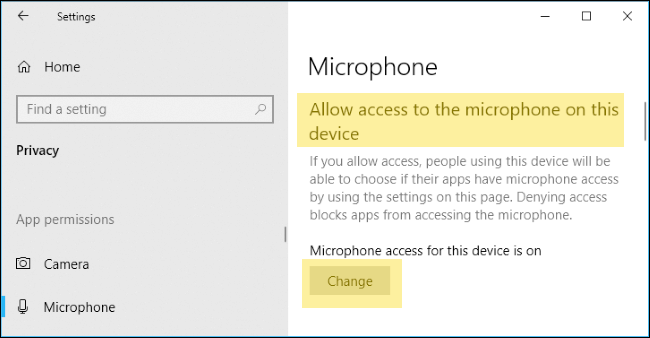
1. select settings > privacy > microphone
2. check “Microphone access for this device is on”
3. If microphone access is off select “Change” button and select “On”

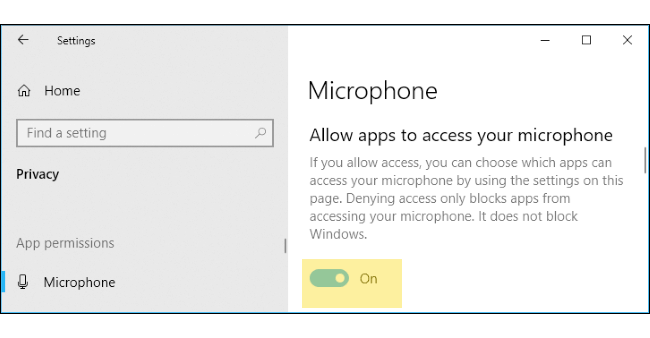
4. Scroll down to “Allow apps to access your microphone” and make sure this is set to “On” as in the screenshot below.

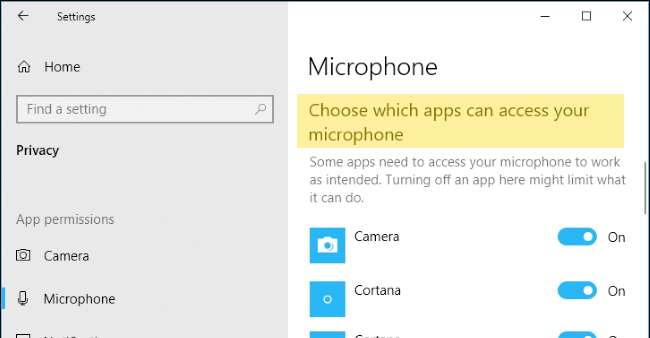
5. Scroll down to the section “Choose which apps can access your microphone” and make sure that your microphone has access to the application your want by toggling the ‘on’ button. Not all applications will be listed here, most of your desktop apps will have access to the microphone when you select ‘on’ in number 4 above.

Check that your microphone is enabled in Device Manager
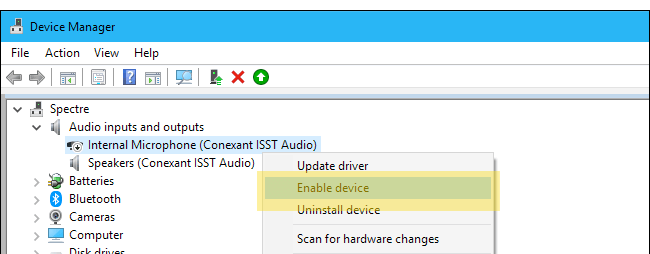
You may have disabled your microphone in Device Manager at some point. To check this go to:
Device Manager > Audio inputs and outputs
Right-click and select “Enable device” on the microphone option

Download updates for Audio Drivers
If you are still having problems with your microphone in Windows 10 you can search for updates for your audio drivers. If you are having difficulty with these updates you can use a driver update tool to automate the updates of all your device drivers, including audio drivers.
Default Microphone in Windows 10
Your PC may be linked to more than one microphone in which case you will need to set one as the default. To do this:
Select Sound > Recording tab
right-click the microphone you want to set as default > select “Set as Default Device”

If you are still having problems after doing this then go to the application you are having problems with and see if there is a setting to choose a default microphone for this application as this may be overriding the settings above.
Run the Audio Troubleshooter in Windows 10
Another option is to use the audio troubleshooter in Windows 10. Go to:
Settings > Update & Security > Troubleshoot
Select “Recording Audio” troubleshooter > click “Run the Troubleshooter” and follow on-screen instructions
Help with audio devices
If none of the above have helped try search for your specific error using our search function, you can also view some of the articles below and post your issue in the comments to see if anyone in our community can help you.

Leave a Reply